Adding Unicode symbols at the command line in Mac OSX using iTerm2
- 2 minutes read - 288 words
Unicode bumper sticker
I assembled the following answer by finding several disparate pieces to the puzzle, but I didn’t find an all-in-one explanation. So here’s how I did it.
As someone who has studied several European languages and a notation system or two, I really like having access to the special symbols unique to a language. While OSX makes it easy to enter the standard Latin character set “special” glyphs like é thanks to ( ⌥+e, e ), other characters are not so easy to find without a “character picker” like logic and set theory “?” or the Dutch “?.”
Here’s how to make this entry easy in Mac OSX:
- System Preferences -> Lanugage & Text -> Input Sources -> Scroll to the bottom -> Unicode Hex Input (Fig. 1)
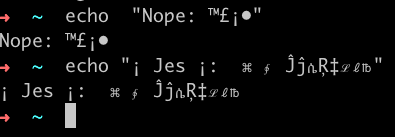
- You should now be able to toggle between input regions with ⌘+Space. Unicode entry looks like Fig. 2, below
- Now in an OSX application try this out. Open TextEdit and press-and-hold ⌥ (option) and then key in
2318. Release option and violà, you should have the unicode character ‘PLACE OF INTEREST SIGN’: ⌘
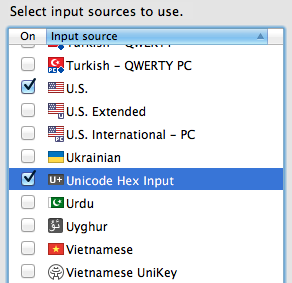
Fig. 1

Fig. 2
Now if you flip over to iTerm2, you should be able to enter the same character at the prompt using the same technique. If you’re still in the normal entry (U.S. input region, in my case), entering ⌥+2318 will result in four unique characters. Make sure you’re in the right input region and you will get your symbol on the command line.
As a quick note, I had forgotten that I was mapping option to ESC on my keyboard config. If this is the case, use the right hand side ⌥ while in unicode input mode to get the right glyph.
