Working with NSAffine Transform in Cocoa
- 7 minutes read - 1306 wordsWhen I last undertook to teach myself Cocoa, about a year and a half ago, one technique in particular seemed poorly documented, mysterious, and generally lacking intelligible example that didn’t involve pulling out advanced trigonometry books.
If, by chance, you are searching on these terms and you should find my site here, I should hope that I make your life a goodly bit easier by giving you a simple example with concrete explanations. Thanks to the proliferation of people liking Mac OSX, a great many tutorials on the topic have surfaced, but as you’re asking “How do I turn my image about 90 degrees” these tutorials are a bit “heavy” and confusing.
Some of you may pull your hair out upon seeing something like this:

Geez. That really hurts.
Here’s my application that you can use to create a custom subclass of NSView called ImageFlipView.
The function of imageFlipper is to allow you to drag an image into a view and then drag that image into the “flipped” view and, lo, behold the power of the NSAffineTranslform.
Some visuals to give you the idea:
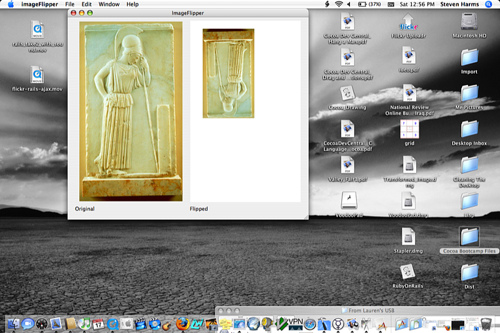
See, I’m dragging my original JPG of an Athena bas-relief, and dragging it into the “flipped” space. The inverted mini-image is the product of an NSAffine rotation.
When the image arrives, it looks like this:
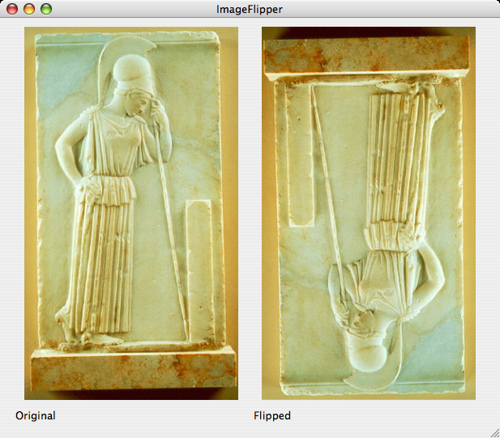
You can drag images out of the Finder into either one of those views and it will be displayed “stretched to fit” in the box either right-side-up or inverted.
Here’s an example:

(Hook ’em Horns!)
More after the jump…
Now, let’s talk about the layout, you’re going to want to take a plain cocoa application.
Drag out an image view, create it as a custom class of ImageFlipView. Copy
that instance and you should have the two panels set.
You’ll need to create a controller that will have two outlets: one to the
originalView and another to the flippedView.
To make life easier, you may want to have your original view preload with an image.
Thus, the whole magic of this particular assignment is the code that describes
my ImageFlipView. Here is the code.
First, the .h file:
/* ImageFlipView */

#import <Cocoa/Cocoa.h>

@interface ImageFlipView : NSImageView
{

  BOOL displayFlipped;
  BOOL isHilighted;

}

-(void)setFlippedValue:(BOOL)flipVal;
-(void)sharedDragMethod:(NSEvent *)event;

@end
OK, now the .m file:
#import "ImageFlipView.h"

@implementation ImageFlipView

- (id)init
{
  self = [super init];
  displayFlipped = NO;

  [self registerForDraggedTypes:[NSArray arrayWithObjects:NSTIFFPboardType,
    NSFileContentsPboardType, NSFilenamesPboardType, NSDragOperationEvery,nil]];

  isHilighted = NO;
  return self;

}


-(void)drawRect:(NSRect) frameRect
{
  NSLog(@"drewRect");
  if ( ![self image] ){
    [[NSColor whiteColor] set];
    [NSBezierPath fillRect:[self bounds]];
    return;
  }

  if ( !displayFlipped ){
    NSLog(@"Image is normal, no transforms.");
  }else{
    NSLog(@"Image is inverted");
    NSAffineTransform *xform = [NSAffineTransform transform];
    NSRect countainerBounds = [self bounds];
    NSSize imageSize = countainerBounds.size;
    [xform translateXBy:imageSize.width yBy:imageSize.height];
    [xform rotateByDegrees:180];
    [xform concat];
  }

  //NSImageView knows all about drawing images, ImageFlipView just sets them up.
  [super drawRect:frameRect];
}

-(void)setFlippedValue:(BOOL)flipVal
{
  displayFlipped = flipVal;
}

-(void)setImage:(NSImage *)anImage
{
  // While the conditional isn't necessary, it's very handy for instructive
  // purposes

  if ( displayFlipped ){
    NSLog(@"YES Displayflipped");
    [super setImage:anImage];
  }else{
    NSLog(@"NO Displayflipped");
    [super setImage:anImage];
  }

  [self setNeedsDisplay: YES];
}


- (unsigned int) draggingSourceOperationMaskForLocal:(BOOL)isLocal
{
  return NSDragOperationCopy | NSDragOperationDelete;
}

-(void) writeNSImageToPasteboard: (NSPasteboard *)pb
{
  [pb declareTypes:[NSArray arrayWithObject:NSTIFFPboardType] owner:self];
}

-(void)draggedImage:(NSImage *)image endedAt:(NSPoint)screenPoint operation:(NSDragOperation)operation
{
  if (operation == NSDragOperationDelete){
    [self setImage:NULL];
  }
}

-(void)mouseDragged:(NSEvent *)event
{
  [self sharedDragMethod:event];
}

-(void)mouseDown:(NSEvent *)event

{
  [self sharedDragMethod:event];
}


// Drop reception methods
-(unsigned int) draggingEntered: (id <NSDraggingInfo>)sender
{
  NSLog(@"DraggingEntered");
  if ( [sender draggingSource ] != self ){
    NSPasteboard *pb = [sender draggingPasteboard];
    /*
    Modifying this is whaht allows you to get images from the finder
    NSString *type = [pb availableTypeFromArray:[NSArray arrayWithObject:NSTIFFPboardType]];
    How it's been left lets you get from the finder, the part here in the comments lets you dragg between
    Custom class views
     */
    NSString *type = [pb availableTypeFromArray:[NSArray arrayWithObjects:NSTIFFPboardType, NSFilenamesPboardType, NSFileContentsPboardType, nil]];
    NSLog(@"Operation was: %@", type);
    if (type != nil){
      return NSDragOperationCopy;
    }
  }
  return NSDragOperationNone;
}

- (void)draggingExited:(id <NSDraggingInfo>)sender
{
  NSLog(@"Draggingexited");
}

-(BOOL)prepareForDragOperation:(id <NSDraggingInfo>)sender
{
  return YES;
}

-(BOOL)performDragOperation:(id <NSDraggingInfo>)sender
{
  NSPasteboard *pb = [sender draggingPasteboard];
  NSString *type = [pb availableTypeFromArray:[NSArray arrayWithObjects:NSTIFFPboardType, NSFilenamesPboardType, NSFileContentsPboardType, nil]];
  NSLog(@"This is the type: %@", type);
  if ( [type  isEqualToString:NSTIFFPboardType] ){
    NSData *draggedImageData = [pb dataForType:NSTIFFPboardType];
    NSImage *draggedImage = [[NSImage alloc] initWithData:draggedImageData];
    [self setImage:draggedImage];
    return YES;
  }else if ( [type isEqualToString: NSFilenamesPboardType] ) {
    NSLog(@"it's a filename type ");
    NSArray * filenames = [pb propertyListForType:NSFilenamesPboardType];
    NSLog(@"Here is the object at index 0: %@", [filenames objectAtIndex:0]);
    NSImage *draggedFileImage = [[NSImage alloc] initWithContentsOfFile:[filenames objectAtIndex:0]];
    [draggedFileImage setScalesWhenResized:YES];
    NSRect selfBounds = [self bounds];
    [draggedFileImage setSize:selfBounds.size];
    [self setImage:draggedFileImage];
    return YES;
  }
  return NO;
}

-(void)concludeDragOperation:(id <NSDraggingInfo>)sender
{
  NSLog(@"concluded drag operation");
  [self setNeedsDisplay:YES];
}

-(void)sharedDragMethod:(NSEvent *)event
{
  // This is the method that allows me to do that groovy inverted drag-icon.
// Get the point where the action occurre
  NSPoint p;
  p = [self convertPoint:[event locationInWindow] fromView:nil];
  //Get a Pasteboard
  NSPasteboard * pb;
  pb = [NSPasteboard pasteboardWithName:NSDragPboard];
  // Get the source image
  NSImage *sourceImage;
  sourceImage = [self image];
  [sourceImage retain];
  //Create an image that is one half of the size of the original.
  NSSize origSize = [[self image] size];
  NSSize newSize = NSMakeSize(origSize.width * 0.5,origSize.height * 0.5);
  //Create the image space for drawing.
  NSImage *resizedImage = [[NSImage alloc] initWithSize:newSize];
  //Composite the original drawing into the locked space
  // If you don't do this, you don't get the mini image
  [resizedImage lockFocus];
  //Them kooky AffineTransforms
  NSAffineTransform * xform = [NSAffineTransform transform];
  [xform translateXBy:newSize.width yBy:newSize.height];
  [xform rotateByDegrees:180];
  [xform concat];
  NSImage *theImage = [self image];
  [theImage drawInRect:NSMakeRect(0,0,newSize.width,newSize.height)
          fromRect:NSMakeRect(0,0,origSize.width, origSize.height)
           operation:NSCompositeSourceOver fraction:1.0];
  // For balance
  [resizedImage unlockFocus];
  //Put the image on the pasteboard
  [pb declareTypes:[NSArray arrayWithObject:NSTIFFPboardType] owner:self];
  [pb setData:[[self image] TIFFRepresentation] forType:NSTIFFPboardType];
  //Make that behave as our dragging image
  [self dragImage:resizedImage at:NSZeroPoint offset:NSZeroSize event:event pasteboard:pb source:self slideBack:YES];
  //Release the created / retained objects
  [resizedImage release];
  [sourceImage release];
}

@end
The particularly interesting part for anyone trying to master NSAffineTransform is found on line 194:
  NSAffineTransform * xform = [NSAffineTransform transform];
  [xform translateXBy:newSize.width yBy:newSize.height];
  [xform rotateByDegrees:180];
  [xform concat];
  NSImage *theImage = [self image];
  [theImage drawInRect:NSMakeRect(0,0,newSize.width,newSize.height)
          fromRect:NSMakeRect(0,0,origSize.width, origSize.height)
           operation:NSCompositeSourceOver fraction:1.0];
This creates our inverted ‘drag image’.
First we create a transform.
newSize holds the size of the image currently in the box. This effectively,
although invisibly, moves the image in the box up to its top right corner. You
may want to use two note-cards to get the idea. Write O (original) on one and T
(transform) on the other. We start with the two lying upon one another. After
the translation the upper-right corner of O meets the lower left corner of T.
They’re diagonal.
I then tell it to rotate 180 degrees counterclockwise. Thus flip “T” around to the left 180 degrees, T should now be overlaying O, but upside down.
To effect the change I use the concat method.
I then get the current image - the current, inverted image. I tell it to
draw itself into the new restricted size defined by NSSize newSize. It takes
its data sources as the contents of “the box” (don’t forget: inverted!). It
makes this a solid opaque image versus something with some translucence (thus
1.0 means opaque).
If you understood that, then you’ll breeze through how I used it in the drawRect: method:
  if ( !displayFlipped ){
    NSLog(@"Image is normal, no transforms.");
  }else{
    NSLog(@"Image is inverted");
    NSAffineTransform *xform = [NSAffineTransform transform];
    NSRect countainerBounds = [self bounds];
    NSSize imageSize = countainerBounds.size;
    [xform translateXBy:imageSize.width yBy:imageSize.height];
    [xform rotateByDegrees:180];
    [xform concat];
  }
When drawRect (which is how subclasses of NSView decide “what to show you”)
is run by the ImageFlipView it if its instance variable displayFlipped is
false. If it isn’t (i.e. it is a flipped view) it performs the same Affine
Transform to give you the inverted image.
I left all my comments and debugging NSLog calls in place so that one can
step through the code easily.
I hope having a live and very simple example makes your progression with this